
Hi everyone!
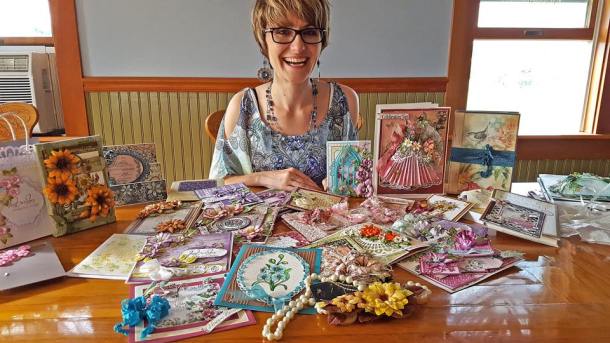
I’m super excited to help celebrate Emma Lou’s birthday! Here is a picture of her with all the cards we created for her.
As a surprise we decided to do a Blog Hop so everyone can see all these lovely cards! When I was trying to decide what type of birthday card to create for her I came across a picture of a card that when I tried to follow the link the link was broken so I cannot tell you where this originated from. As there were no instructions I decided to create my own. I hope you like it 🙂 I call this card a Fold Back Diamond Popup Card.
The Hop will start at 8am EST on Thursday August 11th and close on Tuesday August 16th at midnight.
Heartfelt Creations will post a winner for the hop on Facebook on Wednesday 17th August and I will also announce it on my blog.
They will use Random.org to select a blog (numbered in order of the hop) and then again a comment from the blog!
The winner receives a $25 gift certificate to shop at Heartfelt Creations. To claim they will need to send to: passionforsparkle@gmail.com with “Winner of Emma Lou’s Birthday Blog Hop” in the subject line.
The winner of the blog hop will have 72 hours to claim their prize otherwise another name will be drawn.
Finally here is your blog hop participants, make sure to visit every one for more chances to win:
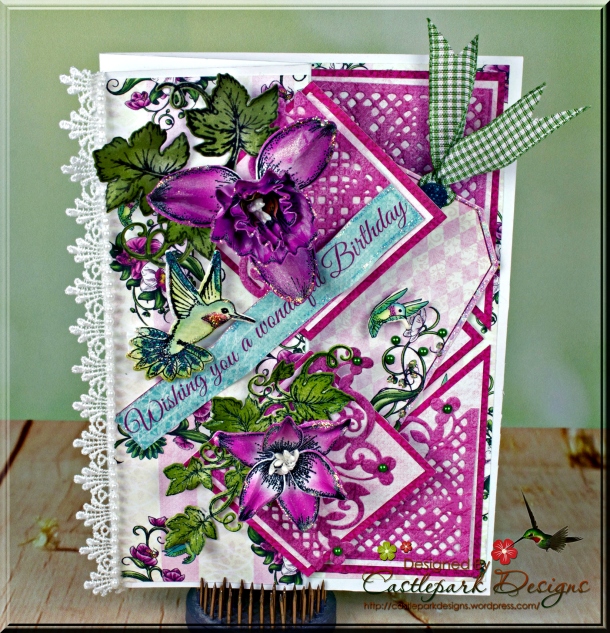
and the card open:
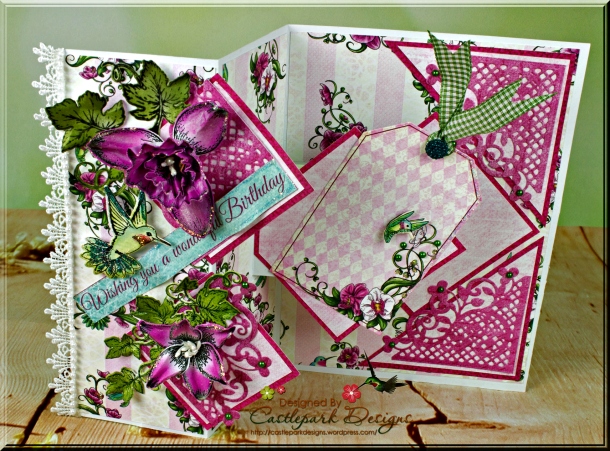
So today I thought that I would show you step by step how to make this card.
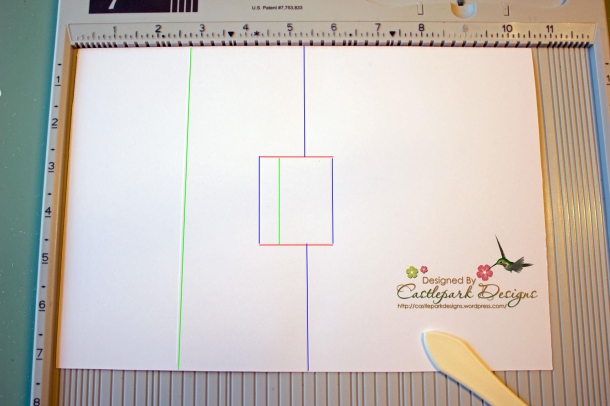
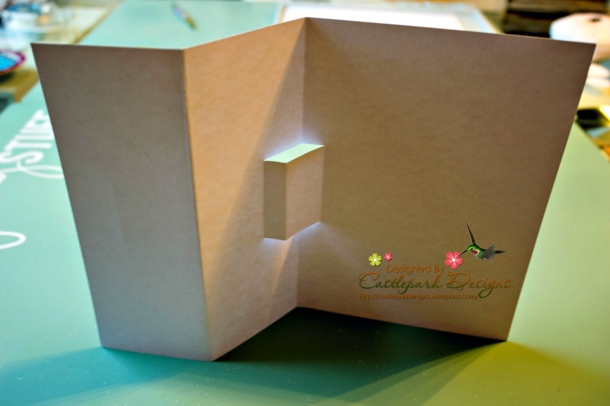
Step 1
Take a piece of card stock 10 1/2″ x 7 1/4″ and place it on your scor board. I colored the scor lines so you can see. First we need to make the cut lines shown in Red. From the back of your card stock measure in 4 3/4″ from the left side (remember your card stock will be backwards right now since you flipped it over) and make some marks repeating at 6 1/4″ from the left side. Draw a line 2 3/4″ down from the top between the 4 3/4″ and 6 1/4″ marks and repeat 4 3/4″ down from the top. Once your lines are drawn you will need to use a sharp knife and cut on these lines. Now it is time to scor. The green lines are Mountain folds and the Blue are Valley Folds. The first Mountain fold is at the 2 3/4″ mark and the second is at the 5″ mark between the 2 cut lines. The valley folds are at the 4 3/4″ mark and the 6 1/4″ mark between the cut lines and also at the 5 1/4″ mark on the top and bottom of the cut lines.
Step 2
Once your scoring is complete fold your card stock so it looks like this. You will find it easier if you work on the center pop out section first.
Step 3
Now it is time for some paper. I cut paper from the Botanic Orchid Paper Collection 1/4″ smaller so you have a nice 1/8″ gap on all sides. Make a throw away template that you can trace to make it easier or simply measure and cut the pieces. That is what I did!

Step 4
Attach the panels to your card stock.
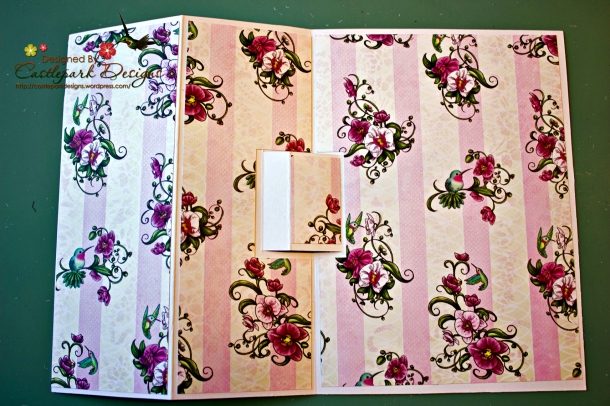
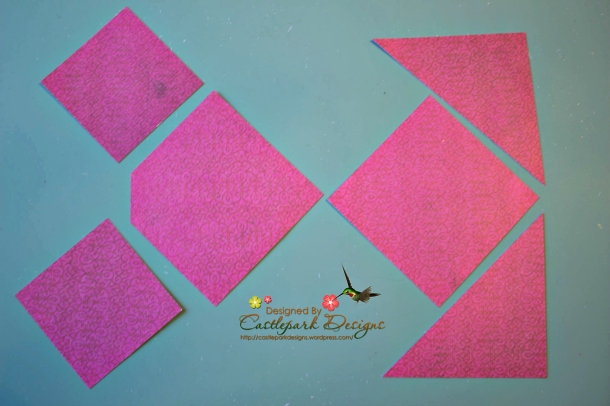
Step 5
Using another piece of paper from the Botanic Orchid Paper Collection you will need a series of squares. I placed them out in the pattern required for demonstration purposes. Starting from the left side, you will need two squares 2 3/8″, another two squares 3 1/8″ and finally one square 3 3/8″ that you will cut in half diagonally. Also notice that one of the 2 3/8″ squares has a piece cutoff. Trim off 1/2″ so that the square will attach to the pop-out.
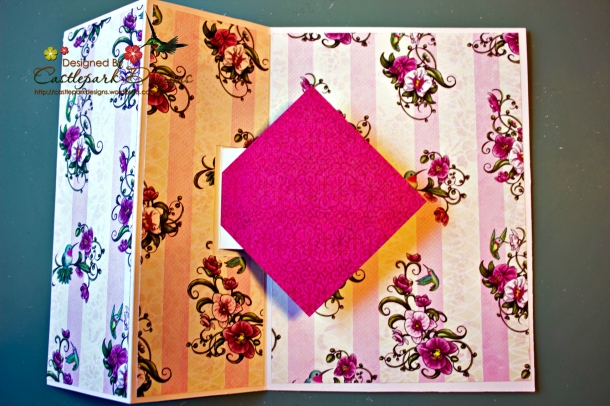
Step 6
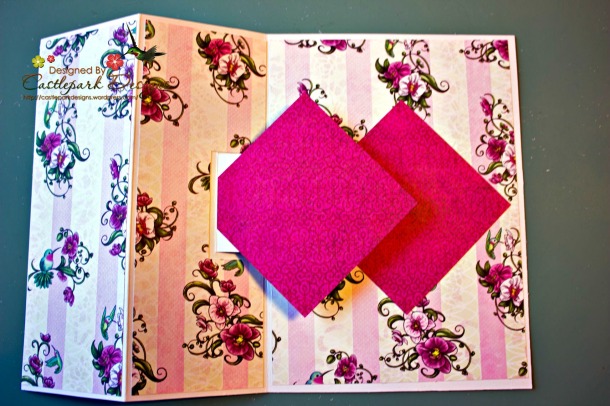
Attach the center square first ensuring that the piece is flush to the left.
Step 7
Take the other large square and attach it directly under the first square when closed. You will need to use a glue that gives you a bit of time to adjust the position to ensure that you get it in the perfect place.
Step 8
Now add the 2 pieces from the square that you cut in half as shown.
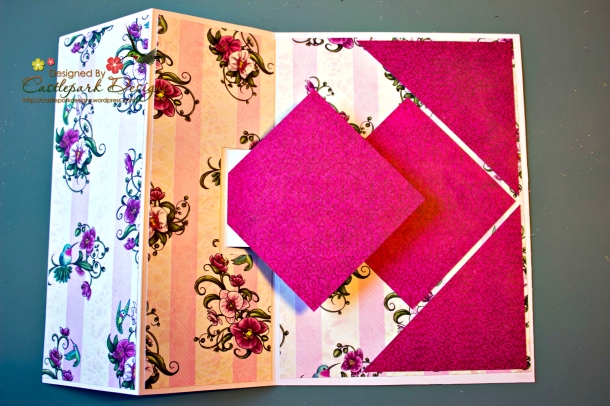
Step 9
Finally add your last 2 squares as shown. I positioned the squares so that the points are on the fold for a nice visual appeal.
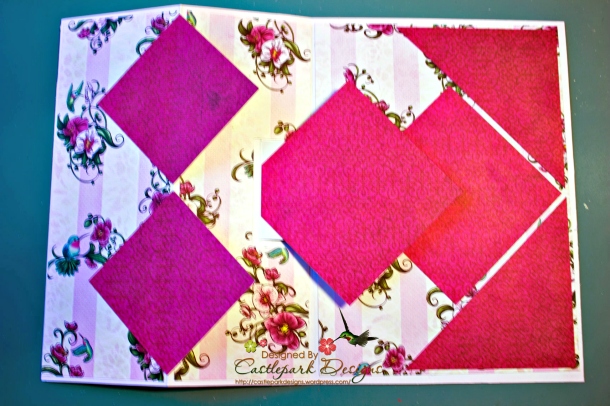
Step 10
Repeat again using another piece of paper from the Botanic Orchid Paper Collection 1/4″ smaller then the previous pieces.
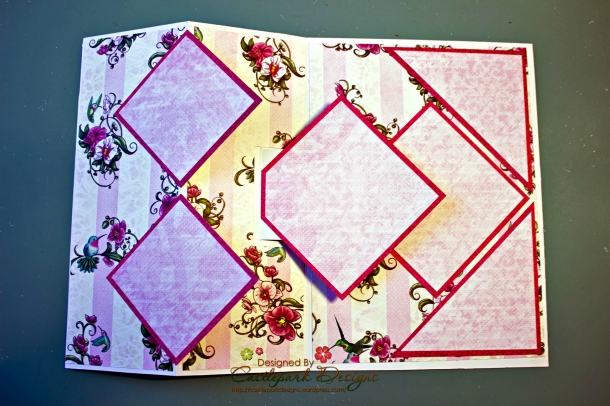
Step 11
Decorate as desired and try to give this one away! I had a hard time. lol
Thanks so much for visiting. Have a wonderful day!


Wow this is awesome thank you for the tutorial too!
LikeLike
Gorgeous!
LikeLike
This is lovely! Love the pretty lace!
LikeLike
Beautiful fold card! Thanks for the tutorial too 🙂
LikeLike
Stunning card! That fusia is perfection
LikeLike
Gorgeouus card & Thanks for the tutorial 🙂
LikeLike
Very Beautiful. Emma must have been overwhelmed with all the creativity and beauty of the cards. Thank you Joann.
LikeLike
Another beautiful card created with the awesome papers from Heartfelt Creations. Thanks for sharing.
LikeLike
Awesome card –loved the tutorial
LikeLike
Gorgeous! Thanks for the fab tutorial… I’m bookmarking it for future reference as I really want to try this!
LikeLike
Stunning card, love the vibrant colour choice and layering. Great tutorial too. Hugs Suzi x
LikeLike
beautiful card Joann, love the pop of fuscia.
LikeLike
Happy sigh. Love this
LikeLike
love this!
LikeLike
This is so pretty and I love that you showed a tutorial on making the card. I am definitely a visual learner so having the photos was very helpful, thank you!
LikeLike
Beautiful card…. and a tutorial too – Thanks!
LikeLike
Oh my oh my!! What an amazing card!! And Emma Lou looks so happy!! Thank you for sharing and for the hop 🙂 x
LikeLike
What an awesome card. Thanks for including the tutorial. I’ll have to try it!
LikeLike
I absolutely adore everything about this card! Such a great inspiration!
LikeLike
I am going to make this one! Wonderful tutorial.
LikeLike
Love the color
LikeLike
Absolutely gorgeous birthday card with those fantastic colors. Great tutorial too!
LikeLike
Fantastic. I love the vivid purple.
The design of the card is fun.
thanks for helping Emma-lou celebrate her birthday.
LikeLike
absolutely breath taking, thank you for the tutorial
LikeLike
Your card is beautiful. Emma Lou is fortunate to have such creative friends!
LikeLike
Beautiful work! I so get when you say “Try to give this one away” I have a few in my stash that I am having a hard time parting with.
LikeLike
Loved the detailing in this card! Simply awesome😊!
LikeLike
Wow…gorgeous card and great tutorial!!!
LikeLike
Wow! What a gorgeous card! Great tutorial.
LikeLike
Gorgeous card an wonderful tutorial!
LikeLike
Emma Lou will love this! Beautiful work!
LikeLike
What a lovely card and thank you for the tutorial. I love tutorials.
LikeLike
fantastic wishes, well done
LikeLike
Very detailed! I love the vibrant colors. I have this paper and will try to scrap lift it.
LikeLike
Beautiful bright colored card.
LikeLike
Beautiful card. Love the colors.
LikeLike
What an amazing card! Beautiful colours and decoration too.
LikeLike
Beautiful card. Love the colors and all the pretty elements. Great design.
LikeLike
Bright colors!!!
LikeLike
Absolutely stunning. I shall try and give this a go, who knows what it will turn out like, lol!! x
LikeLike
Beautiful card Joann! Great tutorial and flowers! Blessings! Kathy
LikeLike
Purple is my favorite color. What a nice gift for Emma Lou.
LikeLike
Love the colors!
LikeLike
Very pretty card. Amazing talent.
LikeLike
Awesome card! Gorgeous fold, coloring and details! Lucky lady to get all these special birthday wishes! Happy Birthday to Emma Lou!
LikeLike
Gorgeous card!!
LikeLike
Saved to my Pinterest. Purple is my favourite colour. Thankyou!!!
LikeLike
Awesome card!
LikeLike
Thanks for sharing how you made this beautiful card. Love the colors.
LikeLike
WOWers! Simply stunning! Jaw must be picked up off table. LOL
LikeLike
I just left you two comments (lengthy!) and both have vanished! I’ve also tried following you, but that didn’t work either. Anyhoo…your card is word defying! Gorgeous colors and an inspiring design! thank you for your tutorial-I would love to try this type of card sometime, but I’m afraid it would never look this beautiful! A great thing about these blog hops–you get to see the lovely work and find great bloggers you haven’t met yet. I’m still going to try and follow you! I had a peek around and I love what I see.
LikeLike
Yeah! It worked!
LikeLike
This is so stunning and in my favorite color purple! !!!! Exciting step by step. Thanks
LikeLike
Wow! That’s a card and a half!! Beautiful!
LikeLike
Thanks for the inspiration as well
LikeLike
Great tutorial….Thank you! Beautiful card too!!! Happy Birthday Emma Lou!!!
LikeLike
Beautiful card…thanks for the tutorial.. Happy Birthday Emma.. God bless you..May He fulfill all of your desires and bless you with sound health in the years that follow..XOXO
LikeLike
Emma Lou will just love your card. It is beautiful.
LikeLike
great card.
LikeLike
Beautiful card
LikeLike
Beautiful card and thank you very much for the tutorial. I will have to give it a try.
LikeLike
Gorgeous, Joann! You always know how to rock a fancy fold card! I know Emma Lou will have loved this!
LikeLike
Wow so beautiful n colorfull perfect for birthday n thanks for the making tutorial
LikeLike
WOW!
LikeLike
WOW!!!!
LikeLike
I have a hard time giving some of mine away too! The blog hop is a fun idea!
LikeLike
amazing colour combo… stunning card
LikeLike
WOW so stunning
LikeLike
Love your color choices!!
LikeLike
This card is so beautiful! Love the colours and design xx
LikeLike
This card is so beautiful. Love the colours xx
LikeLike
Oh this is so stunning and what a great fold you created. What a great way to celebrate Emma Lou’s birthday with a wonderful blog hop.
LikeLike
Thank you for the tutorial, Love it.
LikeLike
So VERY pretty!! LOVE it!
LikeLike
Love, LOve, LOVE! TY so very much for the instructions as I’ve seen this done, but really need to read it in order to comprehend! Wonderful color, too. I know sweet Emma Lou loved it! (My birthday was Sat, so I’m thinking this is a birthday present to me, too!)
LikeLike
I can see you have put so much work and love into this card, superb 🙂
LikeLike
Gorgeous colours
LikeLike
Beautiful card! I just love it.
LikeLike
Very beautiful card!
LikeLike
What a vibrant and lovely card!! Fabulous!!
LikeLike