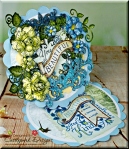
Hi everyone! Welcome back for Heartfelt Creations Wednesday inspiration. Today is an exciting day since we are doing a blog hop with Creative Embellishments and to show off their lovely products I created a card featuring their Flourish Circle Frame which I absolutely love 🙂
don’t you just love the detail
finally, to pretty to close up!
Products Used:
HCPC-3752 – Classic Rose Cling Stamp Set
HCPC-3755 – Blushing Rose Stem Cling Stamp Set
HCPC-3756 – Blushing Rose Swirls Cling Stamp Set
HCPC-3757 – Blushing Rose Background Cling Stamp Set
HCD2-750 – Cut Mat Create 1B Die
HCD1-7110 Classic Rose Die
HCD1-7113 – Blushing Rose Stem Die
HCD1-7114 – Blushing Rose Swirls Die
HCDP1-271 – Blushing Rose Paper Collection
You Had Me at Yellow from the Bright Ideas Prills – 12 Pack
Deluxe Flower Shaping Kit
Art Institute Glue – Dries Clear Glue
Spellbinders Tool N’ One
Scor-Pal Measuring & Scoring Board
Project Instructions:
Other products: White Card Stock, Light Blue Card Stock, Yellow Card Stock, Spellbinders Grand Scalloped Circles, Spellbinders Grand Circles, Versamark, Cornflower Embossing Powder, Distressed Markers (Squeezed Lemonade and Forest Moss), Rose Gold Stickles, Tumbled Glass Distressed Glitter, Black Onyx Ink, Distressed Ink (Squeezed Lemonade, Tumbled Glass, Brushed Corduroy and Forest Moss), Frost Glitter Paste, 3D Foam Dots, Opaque Sparkle Embossing Powder and die cutting machine.
Instructions:
This card measures approx 6 3/4″ round when complete. To make this card first take a piece of white card stock 7″ x 12″ folder in half and die cut using the 6″ Spellbinders Grand Circles making sure that you leave a bit of the fold outside the die cut to allow the card to open. Once die cut you will have 2 circles joined in the middle. Scor one of these 2 circles in the middle to allow the top of the card to bend open. Next die cut 2 of the 6 3/4″ Spellbinders Grand Scalloped Circles out of blue card stock and layer on either side of the white part. For an easel card tutorial you can click here. The top of the card is finished by layering a piece of paper from the Blushing Rose Paper Collection followed by a piece of pale yellow card stock and finally another piece of paper from the Blushing Rose Paper Collection as shown. The inside was completed by layering a piece of paper from the Blushing Rose Paper Collection followed by the Blushing Rose Background Cling Stamp Set stamped on white card stock with Versamark and heat embossed with Cornflower Embossing Powder before die cutting with the Cut Mat Create 1B Die and colored with Distressed Markers and accented with Rose Gold Stickles. To complete the inside, the Blushing Rose Background Cling Stamp Set was stamped again using white card stock with Versamark and heat embossed with Opaque Sparkle Embossing Powder before die cutting with the matching die and accented with Rose Gold Stickles. The front of the card was decorated by first covering the Creative Embellishments Flourish Circle Frame with Dries Clear Glue and Tumbled Glass Distressed Ink before adhering to the front panel as shown. The yellow Classic Rose flowers were stamped on white cardstock with Black Onyx Ink and cut with the matching die. They were distressed with Squeezed Lemonade before shaping the flowers with the Deluxe Flower Shaping Kit. To finish them off they were brushed with Frost Glitter Paste. The Blue Classic Rose flowers were stamped on White cardstock with Black Onyx Ink and cut with the matching die. They were distressed with Tumbled Glass before shaping the flowers with the Deluxe Flower Shaping Kit. To finish them off they were brushed with Frost Glitter Paste. The Blushing Rose Swirls were stamped on white cardstock with Black Onyx Ink and cut with the matching die. They were distressed with Tumbled Glass and Forest Moss distressed inks and attached as shown. The finishing touch for the front was to stamp the Blushing Rose Background Cling Stamp Set on white card stock with Brushed Corduroy before die cutting the sentiment with the matching die and lightly distressing with Brushed Corduroy before adhering with 3D foam dots and accenting with Rose Gold Stickles.
Thanks so much for visiting. Have a wonderful day!









Love the design and the yellow roses are amazing!
LikeLike
Beautiful!
LikeLike
Beautiful as always. You are so talented. I love your cards.
LikeLike
Gorgeous!!
LikeLike