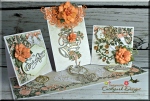
Hi friends! I am super excited to show you the brand new Heartfelt Creations Classic Wedding Collection! This elegant collection is beyond beautiful and so versatile. I hope you enjoy!
Church bells ring out and there’s an excitement in the air! Loved ones have gathered together to celebrate two hearts joined in friendship being united in love! Beautiful roses provide a classic and romantic décor while soft music lends to the ambiance as the bride and groom beam seeing one another for the first time on their wedding day! Preserve those special “Happily Ever After” memories with the new Classic Wedding Collection by Heartfelt Creations. Filled with romantic imagery of stately church bells, classic roses and fanciful doves, this softly hued paper collection is sure to add to the nostalgia and romance of these precious moments while showcasing memories of such a special day. Soft peaches, pinks, greens and blue tones lend a timeless and elegant backdrop to graceful swirls, lace like elements and romantic script! Commemorate the special occasion with dreamily illustrated cling stamp sets depicting glorious heart shaped rose wreaths, elegant church bells, beautiful wedding rings and a delicate image of a bride and groom, complete with coordinating dies perfect for embellishing bridal shower, wedding or anniversary creations! Five marvelous sentiments are included to ensure you have the perfect well wishes to complete your bridal or anniversary card or scrapbook layout! Add a touch of splendor and sophistication with either of the two intricate and impressive lace like dies included in this sentimental collection! So, please rise…and join with us in celebrating those special moments that represent “Always and Forever”!
Products Used:
HCPC-3752 – Classic Rose Cling Stamp Set
HCPC-3774 – Flowering Dogwood Branches Cling Stamp Set
HCPC-3788 – Classic Wedding Roses Cling Stamp Set
HCPC-3789 – Classic Wedding Bells Cling Stamp Set
HCPC-3790 – Classic Wedding Wishes Cling Stamp Set
HCD1-7110 – Classic Rose Die
HCD1-7130 – Flowering Dogwood Branches Die
HCD1-7142 – Classic Wedding Roses Die
HCD1-7143 – Classic Wedding Bells Die
HCD1-7144 – Decorative Medallion Die
HCDP1-279 – Classic Wedding Paper Collection
Deluxe Flower Shaping Kit
Art Institute Glue – Dries Clear Glue
Spellbinders Tool N’ One
Scor-Pal Measuring & Scoring Board
Project Instructions:
Other products: White Card Stock, Spellbinders Labels Twenty-Eight, Archival Tea Rose Ink, Archival Watering Can Ink, Dove Blending Pen, Versamark, Peeled Paint Distressed Ink, Gold Embossing Powder and die cutting machine.
Instructions:
To begin take a 12″x 12″ sheet of cardstock and cut off 4″ from the 12″x 12″ sheet of cardstock so that you’ll have a 4″x 12″ and an 8″x 12″ sheet. Cut the 4″x 12″ sheet into three (3) equal 4″x 4″ panels. Now move on to the 8″x 12″ sheet. With the 8″ top of the paper across the scoreboard, score at 4″ (the middle of the sheet). Turn the sheet so that the 12″ top is across the scoreboard and score at 4″ and 8″. Now, you’ll cut along the 4″ and 8″ scorelines but only down to the center scoreline. These 3 cut sections will be for your card panels. At this time you must decide what direction you want your cards to go to (to twist). Depending on the folds, your cards can face right, left, or forward For the card on my tutorial, I have the 2 end sections twisted to the middle of the card and the center section straight. Starting with the left side, take the corner where you cut on the 4″ line and fold it downward in a triangular shape (in half) with the top corners meeting the outside bottom edge corners of the base panel and along the center scoreline. Repeat this for the other side but in reverse. Instead of folding to the Left you will fold to the right. Finally the center panel is simply folded downward (in half) to the center scoreline. Once your folds are make use your bone folder to get a nice sharp line. Take one 4″ x 4″ panel and evenly align the edge of the card to the edge of the base panel, making sure the bottom of the card is also aligned with the center scoreline. You will be gluing the panels to folds that you have just make to allow the cards to easel. I always practice with a piece of scrap paper to ensure that I have my folds the way I want. Just to change things up a but for the center panel I used a 4″ x 6″ panel so the center section stood out a but more. Finishing by covering in decorative paper from the Classic Wedding Paper Collection and don’t forget to add your flowers! The flowers were stamped on white card stock with Tea Rose Ink and die cut with the matching die before distressing with Tea Rose Ink and finally shaping with the Flower Shaping tool. The wedding bell image was stamped on white card stock with Watering Can Ink and die cut with the matching die before coloring using a Dove blender pen and a combination of Tea Rose and Peeled Paint inks. The sentiments were stamped on White card stock with Watering Can Ink and die cut with Labels Twenty-Eight before distressing with a combination of Tea Rose and Peeled Paint inks. The dove image was stamped on white card stock with Versamark and heat embossed with Gold Embossing Powder before die cutting with the matching die.
Thanks so much for visiting. Have a wonderful day!









Absolutely gorgeous ,love the design,the colour scheme very clever.
LikeLike
Wow love this hugs S xx
LikeLike
A-MAAAZ-ING! Love your colors and those gorgeous flowers!
LikeLike
Really lovely and color scheme is gentle and has a Victorian feel about the whole card. Thank you
LikeLike
Absolutely gorgeous!
LikeLike
Very creative and just downright gorgeous!
LikeLike
Wow Joann, this is absolutely beautiful!!! Love the fancy fold!
LikeLike
wow, outstanding and so elegant, beautiful!!
LikeLike