Hi Friends!
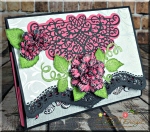
Today I want to show you how you can take something that has an obvious use and turn it into something totally different :). I will be using the largest insert from Heartfelt Creations Pocket and Flipfold Inserts B – Black package and turning it into a clutch purse!
Products Used:
HCPC-3752 – Classic Rose Cling Stamp Set
HCPC-3788 – Classic Wedding Roses Cling Stamp Set
HCPC-3789 – Classic Wedding Bells Cling Stamp Set
HCD1-7110 – Classic Rose Die
HCD1-7119 – Classic Border Basics Die
HCD1-7142 – Classic Wedding Roses Die
HCD1-7143 – Classic Wedding Bells Die
HCD1-7144 – Decorative Medallion Die
HCDP1-279 – Classic Wedding Paper Collection
Deluxe Flower Shaping Kit
Art Institute Glue – Dries Clear Glue
Spellbinders Tool N’ One
Scor-Pal Measuring & Scoring Board
Memento Dye Ink Pad – Bamboo Leaves
Memento Dye Ink Pad – Olive Grove
HCFP1-434-1 – Pocket and Flipfold Inserts B – Black
486490 – Bottle Cap Inc Vintage Magnets .5 Inch 12/Pkg
Project Instructions:
Other products: Pink Card Stock, White Card Stock, Versamark, Fine Black Embossing Powder, Dervent Water Color Pencils (Crimson Lake and Mineral Green), Waterbrush, Silver Gel Pen, Paperlicious Crystal Clear and die cutting machine.
Instructions:
Start by taking the largest Pocket and Flipfold Inserts B – Black and place it with the 2 smallest sections on the bottom facing you. Using the Classic Border Basics Die, die cut the top most panel as close to the top as possible. Next starting from the bottom, glue a magnet centered left to right and top to bottom in the bottom section and then fold over and glue the entire bottom section to the second section sandwiching in the magnet. Take 2 pieces of pink card stock measuring 2″ x 1 3/4″ scored at every 1/4″ mark with the 2″ side on the left of your scor-pal and fold like an accordion. Glue 1 edge of each accordion to each side of the doubled panel and apply glue to the other side of the accordian and fasten to the next panel forming a pocket. The next panel will also be doubled. Accomplish this by folding on the scor line and gluing back to back to form the doubled panel. Now it is time to form the second pocket. Using the same process to form the first pocket, repeat but increase the size of the paper required to 3 1/4″ x 2″. To finish off the clutch purse, cover both the inside and outside with decorative paper from the Classic Wedding Paper Collection ensuring that you sandwich in another magnet between the Flipfold Inserts and the decorative paper on the front of the purse. The flowers were stamped on white card stock with Versamark and heat embossed with Fine Black Embossing Powder and die cut with the matching die before coloring with water color pencils and a water brush, finally shaping with the Flower Shaping tool. The leaves were stamped on white card stock with Olive Grove ink and die cut with the matching die before distressing with Bamboo Leaves. The garland and heart wreath images were stamped on white card stock with Versamark and heat embossed with Fine Black Embossing Powder and die cut with the matching die before coloring with water color pencils and accenting with a Silver Gel Pen and Paperlicious Crystal Clear.
Thanks so much for visiting. Have a wonderful day!











So beautiful Joann!
LikeLike
Absolutely beautiful!!
LikeLike
This is one beautiful creation! Well done!
LikeLike
This is not only beautifully done but it is useful. Very clever idea, Joann. Thank you and HAPPY CANADA DAY 150 YEARS.
LikeLike
Thank you for sharing the idea about another use for the inserts. Gorgeous colour combinations!
LikeLike
I like the black and pink! Inky hugs
LikeLike