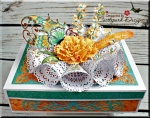
Hi everyone! Today we are celebrating a special release that you are sure to love! I’ve created a special box to show you some of what you will see in this release. It’s just a sample so be sure to head over to the Heartfelt Creations website to check it out for yourself!
Products Used:
HCPC-3806 – Small Camelia Carnation Cling Stamp Set
HCPC-3807 – Large Camelia Carnation Cling Stamp Set
HCPC-3816 – Lush Lilac Cling Stamp Set
HCPC-3824 – Fluttering Butterfly Cling Stamp Set
HCD1-779 – Regal Borders and Pockets Die
HCD1-7164 – Small Camelia Carnation Die
HCD1-7165 – Large Camelia Carnation Die
HCD1-7170 – Lush Lilac Die
HCD1-7178 – Fluttering Butterfly Die
HCD2-7190 – Frame a Card Leafy Borders Die
HCD2-7192 – Eyelet Lace Frames Die
HCDP1-289 – Butterfly Dreams Paper Collection
HCFB1-464 – 3D Floral Basics Shaping Mold
HCFB1-466 – 3D Lush Lilac Shaping Mold
HCS1-459-1 – Assorted Pearl Stamens-Small
HCST1-401 – Deluxe Flower Shaping Kit
159723 – Art Institute Glue – Dries Clear Glue
359848 – Spellbinders Tool N’ One
173842 – Scor-Pal Measuring & Scoring Board
RACP239 – Ranger Archival Ink Pad – Monarch Orange
RACP500 – Ranger Archival Ink Pad – Paradise Teal
Project Instructions:
Other products: White Card Stock, Versamark, Super Fine White Embossing Powder, Diamond Stickles, Brilliance Ink – Pearlescent Thyme, Ranger Archival Ink Pad – Orange Blossom, Copper Micro Glitter, Quickie Glue Pen and die cutting machine.
Instructions:
Start by making a 5 1/2″ x 7 1/2″ box out of white card stock covering the box with panels made from the Butterfly Dreams Paper Collection. Decorate the bottom of the box with die cuts from the Regal Borders and Pockets Die made from the Butterfly Dreams Paper Collection and the top of the box with a die cut from the Eyelet Lace Frames Die out of the same paper you used for the box. The cones that are placed on the top of this die cut are actually created from the corner die in the Frame a Card Leafy Borders Die. After you die cut the die, form the paper into a cone and attach the 2 ends together. Use a pencil of something similar to get a nice rolled edge. The Carmelia Carnation flowers were stamped on white card stock using versamark and heat embossed with super fine white embossing powder before die cutting with the matching dies and distressing with Monarch Orange ink, finally shaping with the 3D Floral Basics Shaping Mold and the flower shaping tools. The Lilac flowers were stamped on white card stock using versamark and heat embossed with super fine white embossing powder before die cutting with the matching dies and distressing with Monarch Orange ink, finally shaping with the 3D Lush Lilac Shaping Mold and the flower shaping tools and accented with diamond stickles and attached to piece of craft wire. The butterfly was stamped on white card stock using Paradise Teal ink and die cut with the matching die before coloring with Orange Blossom and Pearlescent Thyme inks before accenting with a quickie glue pen and copper micro glitter.
Have a wonderful day!









Stunning creation as always!
LikeLike
Absolutely Gorgeous!!
LikeLike
This is so Creative Joann…love it!
LikeLike